
Good Afternoon teachers, here is a guided handout
on how to use our Canon Image Class D7870/D760/D761 Copier.
In this handout I will
explain how to turn the copier on/off, make a 1-sided copy, and make a 2-sided
copy. Describe in steps how to collate and staple copies while making copies.
Step 1: Turning the Copier On/Off
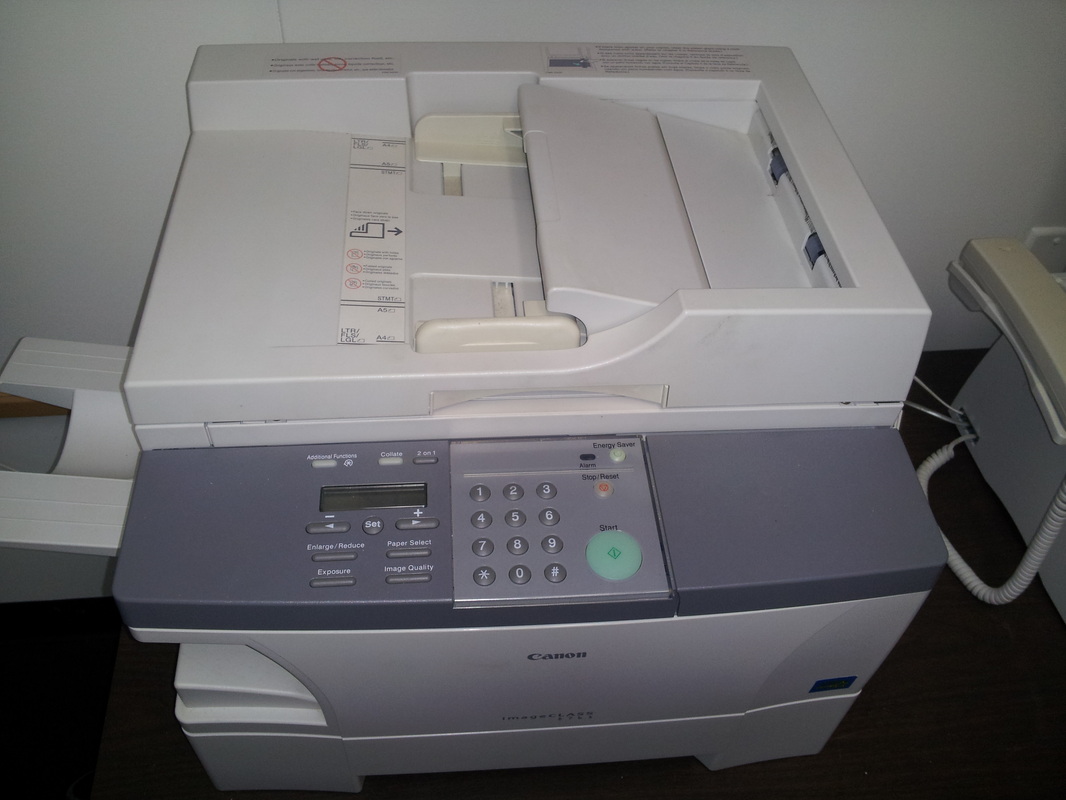
The power button is located on the control panel on top of the copier it reads “energy saver”. This is the button you will push to turn on/off the copier. After turning on the copier allow a few minutes for the machine to warm up before copying any documents.
Step 2: Making a 1- sided copy
You have two options at your disposal when making a 1- sided copy. You can either lift the ADF (Automatic Document Feeder) and place your document on the platen glass. Or you can set your copy on the ADF and it will automatically feed them into the scanning unit once you press start.
Placing a Document on the Platen Glass:
1.Open the ADF
2.Place your document face down on the platen glass. Align the document with the appropriate paper size marks
3.Gently lower the ADF.
a. The document is now ready for scanning. Press Start
Loading Document in the ADF
1.Make sure there is no document on the platen glass.
2.Fan the edges that will feed into the machine first, and then tap the edge of multipage documents on a flat surface to even the stack.
3.Adjust the slide guides to the width of the document.
4.Load the documents face down in the ADF.
a. The document is now reading for scanning. Press Start
Step 3: Making a 2- sided copy
Using the multi-purpose tray, you can copy 2 documents on opposite side of a single sheet.
You have two options at your disposal when making a 2-sided copy. You can either lift the ADF and place your document on the platen glass. Or you can set your copy on the ADF and it will automatically feed them into the scanning unit once you press start.
Placing a Document on the Platen Glass
1.Place the first page of the document face down on the platen glass, and
then press Start to begin copying.
2. Place the next page of the document platen glass
a. Place the page so that the top edge is opposite the top edge of the previous page
3.Turn over the copy you made in step 1 to make sure that the inner and front side of it will remain in the same positions as shown below, and then insert it into the multi-purpose tray.
4.Press Paper Select (on the control panel) to select the multi-purpose tray. (Tray is located on the right side of the printer)
5.Press Start to copy the next page to finish making your two-sided copy.
When Loading Documents in the ADF
1. Load the first page of the document face down in the ADF, the press Start to begin copying.
2. Load the next page of the document in the ADF
a. Load the page so that the top edge is opposite to the top edge of the previous page.
3. Turn over the copy you made in step 1 to make sure that the inner and
front side of it will remain in the same position, and then insert it into the multi-purpose tray.
4.PressPaper Select (on the control panel) to select the multi-purpose tray.
5.Press Start to copy the next page to finish making your two-sided copy.
Step 4: Collate and Staple Copies While Making Copies
The collate copy allows you to sort copies in order of pages. It is
convenient when you make multiple copies of multipage documents.
When Placing a Document of the Platen Glass
1. Place the last page of a document on the platen glass.
a. If a document is set from the first page, the printing will be performed in reverse order.
2. Press Collate
a. The Collate key lights green.
3.Use the numeric keys to set the copy quantity. (located on control panel)
4. Press Start
5.Place the next page of the document.
6. Press Start
a. Repeat steps 5 & 6
7.Press Set
a. The machine begins printing out.
When Loading Documents in the ADF
1. Load documents face down in the ADF.
2.Press Collate
a. The Collate key lights green.
3. Use the numeric keys to set the copy quantity.
4.PressStart
a.The machine begins scanning from the last page of the document. After
scanning, the scanned document will come out in order
b. After each set is finished printing you can grab the set and staple.
on how to use our Canon Image Class D7870/D760/D761 Copier.
In this handout I will
explain how to turn the copier on/off, make a 1-sided copy, and make a 2-sided
copy. Describe in steps how to collate and staple copies while making copies.
Step 1: Turning the Copier On/Off
The power button is located on the control panel on top of the copier it reads “energy saver”. This is the button you will push to turn on/off the copier. After turning on the copier allow a few minutes for the machine to warm up before copying any documents.
Step 2: Making a 1- sided copy
You have two options at your disposal when making a 1- sided copy. You can either lift the ADF (Automatic Document Feeder) and place your document on the platen glass. Or you can set your copy on the ADF and it will automatically feed them into the scanning unit once you press start.
Placing a Document on the Platen Glass:
1.Open the ADF
2.Place your document face down on the platen glass. Align the document with the appropriate paper size marks
3.Gently lower the ADF.
a. The document is now ready for scanning. Press Start
Loading Document in the ADF
1.Make sure there is no document on the platen glass.
2.Fan the edges that will feed into the machine first, and then tap the edge of multipage documents on a flat surface to even the stack.
3.Adjust the slide guides to the width of the document.
4.Load the documents face down in the ADF.
a. The document is now reading for scanning. Press Start
Step 3: Making a 2- sided copy
Using the multi-purpose tray, you can copy 2 documents on opposite side of a single sheet.
You have two options at your disposal when making a 2-sided copy. You can either lift the ADF and place your document on the platen glass. Or you can set your copy on the ADF and it will automatically feed them into the scanning unit once you press start.
Placing a Document on the Platen Glass
1.Place the first page of the document face down on the platen glass, and
then press Start to begin copying.
2. Place the next page of the document platen glass
a. Place the page so that the top edge is opposite the top edge of the previous page
3.Turn over the copy you made in step 1 to make sure that the inner and front side of it will remain in the same positions as shown below, and then insert it into the multi-purpose tray.
4.Press Paper Select (on the control panel) to select the multi-purpose tray. (Tray is located on the right side of the printer)
5.Press Start to copy the next page to finish making your two-sided copy.
When Loading Documents in the ADF
1. Load the first page of the document face down in the ADF, the press Start to begin copying.
2. Load the next page of the document in the ADF
a. Load the page so that the top edge is opposite to the top edge of the previous page.
3. Turn over the copy you made in step 1 to make sure that the inner and
front side of it will remain in the same position, and then insert it into the multi-purpose tray.
4.PressPaper Select (on the control panel) to select the multi-purpose tray.
5.Press Start to copy the next page to finish making your two-sided copy.
Step 4: Collate and Staple Copies While Making Copies
The collate copy allows you to sort copies in order of pages. It is
convenient when you make multiple copies of multipage documents.
When Placing a Document of the Platen Glass
1. Place the last page of a document on the platen glass.
a. If a document is set from the first page, the printing will be performed in reverse order.
2. Press Collate
a. The Collate key lights green.
3.Use the numeric keys to set the copy quantity. (located on control panel)
4. Press Start
5.Place the next page of the document.
6. Press Start
a. Repeat steps 5 & 6
7.Press Set
a. The machine begins printing out.
When Loading Documents in the ADF
1. Load documents face down in the ADF.
2.Press Collate
a. The Collate key lights green.
3. Use the numeric keys to set the copy quantity.
4.PressStart
a.The machine begins scanning from the last page of the document. After
scanning, the scanned document will come out in order
b. After each set is finished printing you can grab the set and staple.
